
Although my oldest son has his very own 3D printer, he hasn’t had time to print any of the items I’ve asked for, including any of the Raspberry Pi cases I liked. (In his defense, he’s been busy with school, robotics, his teaching job, and generally being a driven, successful high schooler.) So I decided to take matters into my own hands and build my own custom case to suit my fancy.
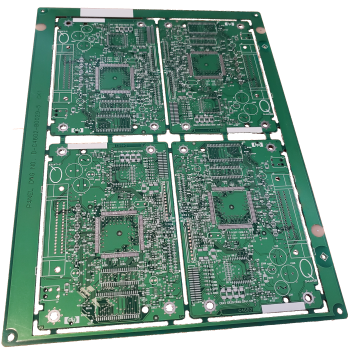
Some years ago, I bought a box of surplus, unpopulated circuit boards, originally intended to be hard drive controller boards. Yes, I am prone to picking up strange things that the ordinary person wouldn’t look twice at. I love, however, to see the alternate possibilities hidden in an object or product. I can be quite happy wandering around a store examining things to consider how they could be put to use, other than in the way originally intended. I even considered making this knack for reapplication my business some years ago.
These circuit boards have come in handy over the years, serving as a light switchplate, a miniature clipboard, and more. Now, however, I’ve found another use.
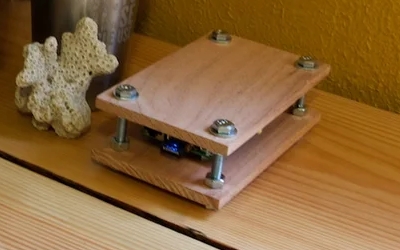
I was inspired by the work of Instructables user Sandshock who created a minimalist case using two pieces of red oak and some nuts and bolts, all sourced from their local Home Depot. However, their case, while certainly wonderful, seems more like a high-end, wood-encased stereo than I wanted. I’m too much of a tech nerd for that, I think.
Fortunately, I had these old hard drive circuit boards laying around, just begging to be used.
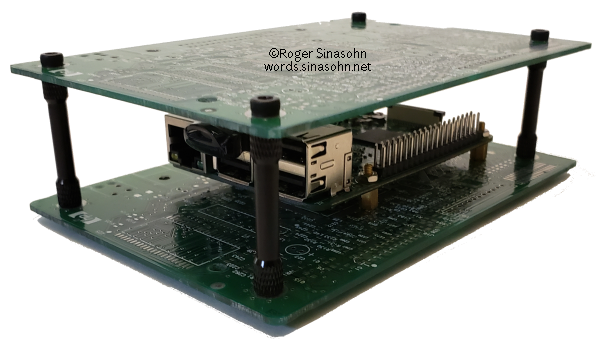
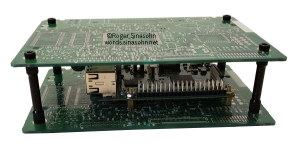
Introducing… The HPi case.

Click a photo to view full-size.
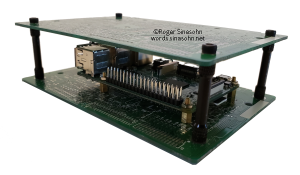
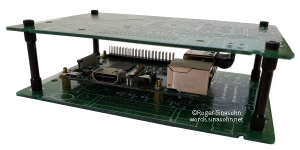
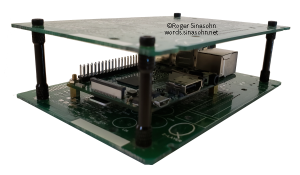
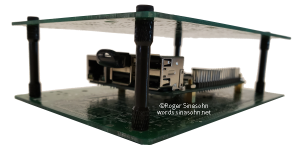
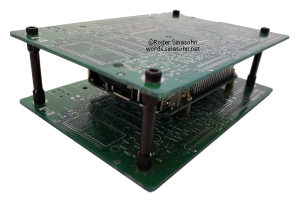
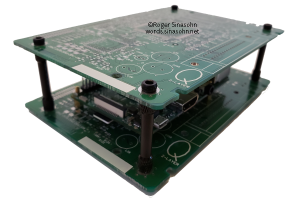
The case consists of two circuit boards with 35mm aluminum spacers (fastened with hex socket head cap screws) at each corner, using the original mounting holes. The Raspberry Pi is mounted to the bottom circuit board on brass standoffs. Currently, (as in, in the photos,) the Pi is mounted on 6mm+6mm standoffs, but I’ve ordered some 4mm standoffs (along with some 4mm flat head screws) so I can reduce the height a bit. Cutting down the height is important going forward as I have plans to expand on this.
In the pictures, you can see a 256GB SanDisk Ultra Fit Flash Drive inserted in one of the USB ports, but as that basically holds only my CD collection, it’s clearly not enough storage. Now, I could put another one in next to it, but why not go for some real storage?
By lowering the height of the Raspberry Pi supports and slightly increasing the height of the corner supports (to 40mm or 45mm), there will be room for a 2.5″ hard drive mounted on the underside of the top of the case. Adding a USB-to-SATA connector will make the system complete. The drive will be mounted using 4mm female-female standoffs, headless grub screws (between the drive and standoffs), and more flathead screws. I’m calling this the Hard Hat (as in an expansion “hat” with a hard drive, get it?).
Why HPi?
Most of my career — as a systems manager, a programmer, a programmer/analyst — has been centered around Hewlett-Packard systems. First the HP3000, a business-oriented minicomputer, then HP-UX-based systems, using HP’s version of the Unix/Linux operating system. HP has been an integral part of my work — and personal — life over the past 35+ years. Not only were HP computers the core of my career, many of my closest friends were people I met in the HP community. It’s safe to say that HP means a lot to me.
In addition to my own HP3000 and assorted HP terminals and other peripherals, one of my favorite possessions is a complete front panel from an HP3000 series III CPU unit. At five feet tall, this panel is complete with front panel switches, lights, and electronics. Someday, it will be mounted on the wall in my office.
One of the reasons I originally bought the surplus circuit boards was because they featured the HP logo at the top — they were undoubtedly intended for use in HP hard drives. This case, with its HP logo on the outside and a Raspberry Pi on the inside was obviously an HPi.
Making your own HPi
Sandshock made his case out of wood; I used surplus printed circuit boards. If you’d like a case like this, nearly any material will work, if you’d like to build your own. Some spacers and screws or nuts and bolts will hold the case together and common standoffs will hold the Raspberry Pi in place.
For reference, here’s what I used (and what I plan to use for the Hard Hat modification):
Parts List – The Basic HPi
- 1 – Raspberry Pi Model 3/4
- 2 – Circuit Boards (unpopulated)
- 4 – 35mm M3 Aluminum F-F Standoffs
- 8 – M3 hex socket head cap screws
- 4 – M2.5 4mm F-F Brass Standoffs
- 8 – M2.5 Flat Head Screws
Parts List – The Hard Hat
- 4 – 40-45mm M3 Replacement Standoffs
- 4 – M3 4mm Headless Grub Screws
- 4 – M3 4mm F-F Brass Standoffs
- 4 – M3 4mm Flat Head Screws
- 1 – 2.5″ Hard Drive (or SSD)
- 1 – USB-to-SATA adapter